Cross slopes
Define a cross slope when you need to confirm the construction of a road surface – typically the carriageway.
Refer to the following diagrams:
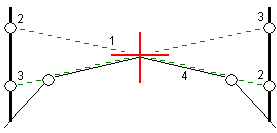
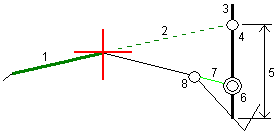
Typically a wire (1) is stretched from one side of the road to the other fixed at position (2) on each stake. The wire is then checked to see that it lies on the formed road surface (4). The process is then repeated for the other side of the road by fixing the wire to the stakes at position (3). The cross slope can be offset vertically so that the wire is above the surface making it easier to confirm the construction. If the cross slope is offset, the measured distance from the wire to the surface should be consistent. The cross slope option reports the deltas, enabling the stake to be marked up with positions (2) and (3).
- A cross slope must be defined in the cross section view.
- A cross slope cannot be defined when measuring your position relative to the road or when staking a side slope.
To define a cross slope
-
From the cross section view, define a horizontal construction offset, typically at Slope previous, and enter a vertical offset if required.
The smaller single circle (8) indicates the selected position and the double circle (6) indicates the selected position adjusted for the specified construction offsets. The construction offset(s) appear as a green line (7).
-
Tap the line (1) that will define the cross slope. The selected line appears as a bold green line.
You cannot select a line that defines a side slope to define a cross slope.
-
From the pop-up menu, select Define cross slope, enter a Cross slope offset if required, and tap OK.
A dashed green line (2) extends from the selected line to intersect with a vertical line (4) at the target stake (3).
- Tap Start.
- Navigate to the target and then stake the position.
-
Use the V.Dist. cross slope value (5) to mark the stake with the second position.
To de‑activate the cross slope function, tap the selected line (1).