To create features using control codes in Measure codes
This topic describes how to create features using control codes in the Measure codes form. You can also create features using control codes in the Measure points or the Measure topo form.
When creating features as you measure observations:
- Always select the feature code first, followed by the control code.
- If required, you can select more than one control code for an observation. Simply select the required control codes on the toolbar.
- If the feature uses multiple line feature codes, or when stringing features, in the Measure codes form tap the Multi-code button
 and select the line feature codes first and then select the control code(s) from the CAD toolbar. Buttons for the active control codes are not highlighted yellow when using the Multi-code button.
- When creating features as you measure points, the workflow is slightly different when using the Measure points or the Measure topo form rather than the Measure codes form. In the Measure codes form you will select first the control code action from the CAD toolbar and then select the feature code because selecting the feature code typically triggers the measurement. In the Measure points or Measure topo form, you will first select the line feature code in the Code field and then use the CAD toolbar to append the control code to the Code field.
-
Because control codes are normally only used once at the start or end of an item, when using the Measure points or Measure topo form the control codes are automatically removed from the Code field once the point is measured. The feature code remains in the Code field, ready for the next point in the feature.
- Tap Start join sequence
 . The Start join sequence code is added to the Code field.
 -
Select the feature code for the feature in the Measure codes form. This feature code must be defined as a line feature in the feature code library. The line feature code is added to the Code field.
- Measure and store the point.
- Continue to measure points to form the line, assigning each point the same feature code as you used for the start point. As you measure and store each point, each line segment appears in the map.
-
When you reach the final point of the line, tap End join sequence
 . The End join sequence code is added to the Code field.
 Tap End join sequence
to make sure the next point that has the same line feature code will not join to this line. However, if you always use Start join sequence when starting a line sequence, then ending a feature with End join sequence is optional. - Measure and store the point. This last stored point ends the line.
-
Tap Start join sequence
. The Start join sequence code is added to the Code field. A tangential arc must be joined to at least one point so that the tangent information can be calculated.
- Select the feature code for the feature in the Measure codes form. This feature code must be defined as a line feature in the feature code library. The line feature code is added to the Code field.
- Measure at least one point, from which the arc will be drawn tangentially.
-
To start creating the arc, tap Start tangential arc
 . The Start tangential arc code is added to the Code field after the feature code.
 The azimuth between this point and the previous point defines the entry tangent direction.
- Measure and store the point.
-
Tap End tangential arc
 . The End tangential arc code is added to the Code field.
 - Measure and store the point. This last stored point ends the arc.
- If required, continue measuring and storing points for the line feature.
If an arc cannot be computed, the segment is drawn as a dashed red line to indicate that something is wrong. Situations where this will occur are:
- An arc is defined by two points and no tangency information is defined at the entry to the start arc point.
- A two point arc is defined as being tangential at both the start and end but these tangents do not work.
- To include the arc as part of a line, tap Start join sequence . The Start join sequence code is added to the Code field.
- Select the feature code for the feature in the Measure codes form. This feature code must be defined as a line feature in the feature code library. The line feature code is added to the Code field.
- Tap Start non-tangential arc
 . The Start non-tangential arc code is added to the Code field.
 - Measure and store the point.
- Continue to measure points to form the arc, assigning each point the same line feature code as you used for the start point. As you measure and store each point, each arc segment appears in the map.
-
When you reach the final point of the arc, tap End non-tangential arc
 . The End non-tangential arc code is added to the Code field.
 - Measure and store the point. This last stored point ends the arc.
To measure the transition point between two back-to-back arcs, tap both the End arc and the Start arc buttons before measuring the last point of the first arc.
If an arc cannot be computed, such as when only two points of the non-tangential arc have been measured, the segment is drawn as a dashed red line to indicate that something is wrong.
Use the Start smooth curve control code to create a smooth looking curve. Subsequent points are added to the smooth curve until you use the End smooth curve control code.
If any point that makes up the curve has a null elevation then the entire curve is considered to be 2D, and will lie on the groundplane.
- Tap Start smooth curve
 . The Start smooth curve code is added to the Code field.
 - Select the feature code for the feature in the Measure codes form. This feature code must be defined as a line feature in the feature code library. The line feature code is added to the Code field.
- Measure and store the point.
- Continue to measure points to form the curve, assigning each point the same line feature code as you used for the start point. As you measure and store each point, each curve segment appears in the map.
- When you reach the final point of the arc, tap End smooth curve
 . The End smooth curve code is added to the Code field.
 - Measure and store the point. This last stored point ends the line.
To measure a rectangle, you can: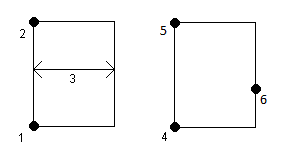
- Measure two points, where the first point (1) defines one corner of the rectangle, the second point (2) defines the next corner of the rectangle, and one of the points includes a width value (3). The first point uses the Start rectangle control code and the line feature code and the second point uses just the line feature code. For one of the points, enter the width value after the line feature code. For example, <Start rectangle> <Line feature> 8 for the first point and then <Line feature> for the second point.
- Measure three points, where the first point (4) defines one corner of the rectangle, the second point (5) defines the next corner of the rectangle, and the third point (6) is used to define the width of the rectangle. The first point uses the Start rectangle control code and the line feature code and the second and third points use just the line feature code.
Rectangles are drawn respecting the elevation of all points.
To measure a rectangle if you do know the width:
- Move to the location of the first corner of the rectangle.
- Tap .
- Select the feature code for the feature in the Measure codes form. This feature code must be defined as a line feature in the feature code library. The line feature code is added to the Code field.
- Tap Start rectangle
 . The Start rectangle code is added to the Code field.
 - Enter the width of the rectangle in the Multi-code field. Enter a positive value to create the rectangle to the right of the line direction, and a negative value to create the rectangle to the left.
- Measure and store the point.
-
Move to the second corner along the length of the rectangle. This point uses the same line feature code you selected for the first point.
- Measure and store the point. This last stored point ends the rectangle, and the rectangle is drawn on the map.
To measure a rectangle if you do not know the width:
- Move to the location of the first corner of the rectangle.
- Tap Start rectangle . The Start rectangle code is added to the Code field.
- Select the feature code for the feature in the Measure codes form. This feature code must be defined as a line feature in the feature code library. The line feature code is added to the Code field.
- Measure and store the point.
-
Move to the second corner along the length of the rectangle. This point uses the same line feature code you selected for the first point.
-
Measure and store the point.
- To measure another point to define the rectangle width, move to a location on the opposite side of the rectangle. This point uses the same line feature code you selected for the first point.
- Measure and store the point. This last stored point ends the rectangle, and the rectangle is drawn on the map.
To measure the circle, measure three points that lie on the edge of the circle. The first point uses the line feature code and the Start circle (edge) control code, and the second and third points just use the line feature code.
Circles are drawn horizontal at the elevation of the first point with an elevation.
- At the first point on the circle edge, tap Start circle (edge)
 . The Start circle (edge) code is added to the Code field.
 - Select the feature code for the feature in the Measure codes form. This feature code must be defined as a line feature in the feature code library. The line feature code is added to the Code field.
- Measure and store the point.
- Move to the second point on the circle edge. This point uses the same line feature code you selected for the first point.
- Measure and store the point.
- Move to the third point on the circle edge. This point uses the same line feature code you selected for the first point.
- Measure and store the point. This last stored point ends the circle, and the circle is drawn on the map.
To measure a circle using the center of the circle, you can: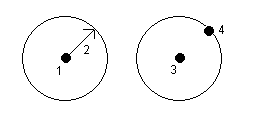
- Measure a single point (1) at the center of the circle where that point uses the Start circle (center) control code and the line feature code, followed by a radius value (2). For example, <Start circle (center)> <Line feature> 8.
- Measure one point (3) at the center of the circle, and then measure a second point (4) which lies on the edge of the circle and is used to define the radius of the circle. The first point uses the Start circle (center) control code and the line feature code and the second point uses only the line feature code. For example, <Line feature> <Start circle (center)> for the first point and then <Line feature> for the second point.
Circles are drawn horizontal at the elevation of the first point with an elevation.
To measure a circle when you know the radius:
- Tap .
- Select the feature code for the feature in the Measure codes form. This feature code must be defined as a line feature in the feature code library. The line feature code is added to the Code field.
- At the center of the circle, tap Start circle (center)
 . The Start circle (circle) code is added to the Code field.
 -
Enter the radius value in the Multi-code field.
-
Measure and store the point.
The circle is drawn on the map.
To measure a circle when you do not know the radius:
- At the center of the circle, tap Start circle (center) . The Start circle (circle) code is added to the Code field.
- Select the feature code for the feature in the Measure codes form. This feature code must be defined as a line feature in the feature code library. The line feature code is added to the Code field.
-
Measure and store the point.
- To measure a point to define the radius, move to a location on the circle edge. This point uses the same line feature code you selected for the first point.
- Measure and store the point. This last point completes the circle, and the circle is drawn on the map.
You can add a horizontal and/or vertical offset value to offset lines and arcs.
You cannot offset linework created using the smooth curve control codes.
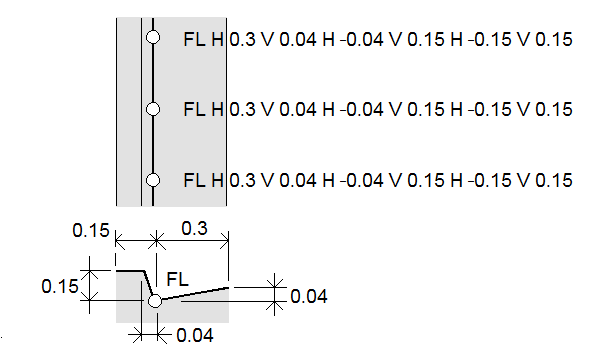
For example, when surveying a curb and gutter you can measure points at the flow line (invert) of the gutter using a line code and then set the horizontal and vertical offset control codes for the curb and gutter. For example, <Line code> <Horizontal offset> 0.3 <Vertical offset> 0.04.
Refer to the following real world example of a curb and gutter where FL is the line code for the flow line, H is the horizontal offset control code and V is the vertical offset control code:
To apply offset values to the next point to be measured:
- Tap Offset
 .
. - From the Number field, select the number of offsets to define.
-
Enter the Horizontal offset and Vertical offset values.
A positive Horizontal offset value offsets to the right of the line direction, a negative value offsets to the left.
A positive Vertical offset value offsets above the line, a negative value offsets below the line.
-
Tap Accept.
The offset information is shown in the Code field, indicating the offset value(s) will be applied to the next measurement.
When applying offsets, Trimble recommends using the Start join sequence
and End join sequence control codes to start and end the line. The End join sequence control code automatically turns off the offset button and removes the offset text.
- To join the current point to a selected point, tap Join to named point
 and then enter the name of the point or select the point in the map and tap Accept.
 - To join a point to the first point in the sequence that has the same line feature code, tap Join to first (same code)
 .
. - To measure a point but not join it to the last measured point, tap No join
 and then measure and store the point.
- To check what the next point name will be, tap
 . The text after the Next point name menu item indicates the next point name.
 - To set the name for the next point, tap and select Next point name.
- Enter the point name and the code for the next point.
- Tap Accept.
