To create a template of a measurement code sequence
To automatically select the next code button in the code group after storing a measurement using Measure codes, configure the Template pickup settings in the Edit Measure codes screen. Template pickup is particularly useful when coding observations in a regular pattern, for example, a road cross section.
- Tap
 and select Measure / Measure codes.
 - In the Measure codes form, tap
 . The form changes to the Edit Measure codes screen.
 - In the Template pickup group, select the Enable check box to enable template pickup on the code buttons in the group. The template icon
 appears on each code button used in the template.
 -
In the Number of elements field, enter the number of elements in the template. The number of elements in the template can be fewer than the number of buttons in the group.
For example, in a 3x3 button layout you could choose to have 6 buttons in the template and use the additional 3 buttons in the group for extra items that you commonly measure but that are not part of the template. The first 6 buttons would be included in the template, but you can reorder the buttons as required. Tap a button to select it and then tap the left arrow or right arrow softkey to move the button.
-
Configure the template pickup Direction. Refer to the following diagram:
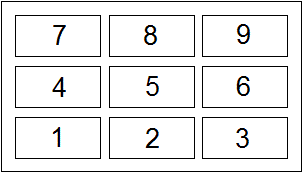
For the example above, where the template uses 6 buttons (buttons 4 through 9:
- Left to right – The highlight moves from 7–9, then 4–6, then 7–9 again and so on.
- Right to left – The highlight moves from 6–4, then 9–7, then 6–4 again and so on.
- Zig zag – The highlight moves from 7–9, 4–6 then 6–4, 9–7, then 7–9 again and so on.
During measurement, you can skip a code in the template by tapping a different code button or by using the arrow keys to select a different button.
