To key in an arc
-
Tap
and select Key in / Arcs.
- Enter the arc name and, if required, the code for the arc.
- Define a new arc using one of the following methods.
- To change how distances are calculated, tap Options. See Cogo settings.
- Tap Calc.
- Tap Store.
- In the Method field, select Two points and radius.
-
Select the start point (1) and end point (2), and enter the radius (3) of the arc.
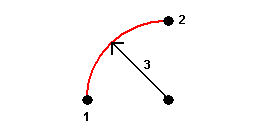
- Specify the direction of the arc.
- Enter values for the Start station and the Station interval.
- If required, select the Store center point check box and then enter a point name for the centre point.
- In the Method field, select Arc length and radius.
-
Select the start point (1), the back tangent (2), the radius (3)and the length of the arc.
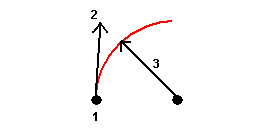
- Specify the direction of the arc and the grade between the start and end points.
- Enter values for the Start station and the Station interval.
- If required, select the Store center point check box and then enter a point name for the centre point.
- In the Method field, select Delta angle and radius.
-
Enter the name of the start point (1), the back tangent (2), the radius (3) and the turned angle (4) of the arc.
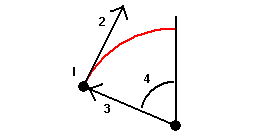
- Specify the direction of the arc and the grade between the start and end points.
- Enter values for the Start station and the Station interval.
- If required, select the Store center point check box and then enter a point name for the centre point.
- In the Method field, select Intersect point and tangents.
-
Select the intersection point (1), and enter the back tangent (2), the forward tangent (3) and the radius (4) of the arc.
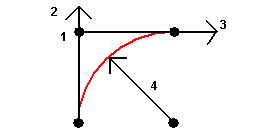
- Enter values for the Start station and the Station interval.
- If required, select the Store center point check box and then enter a point name for the centre point.
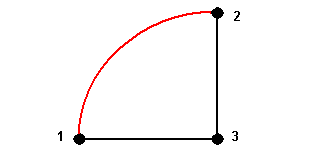
- In the Method field, select Two points and center point.
- Specify the direction of the arc.
-
Select the Start point (1), End point (2), and Center point (3) of the arc.
- Enter values for the Start station and the Station interval.
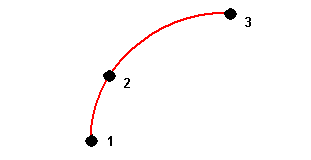
- In the Method field, select Three points.
-
Select the Start point (1), the Point on arc (2), and the End point (3) of the arc.
- Enter values for the Start station and the Station interval.
- If required, select the Store center point check box and then enter a point name for the centre point.
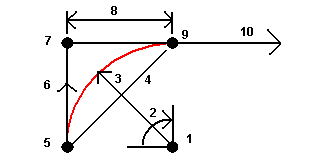
The features of an arc are indicated below.
1
Center point
2
Delta angle
3
Radius
4
Chord length
5
From point
6
Back tangent
7
Intersection point
8
Tangent length
9
To point
10
Forward tangent
The back tangent value (6) is related to the direction (right in the above diagram) in which the station or chainage increases. For example, when you stand at the intersection point (7) looking in the direction of increasing station or chainage, the forward tangent (10) is in front of you and the back tangent (6) is behind you.
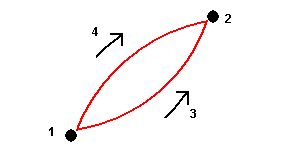
The direction field defines whether the arc turns to the left (counterclockwise) or right (clockwise) from the start point (1) to the end point (2). The following diagram shows both a left (3) and right (4) arc.
The grade of the arc is determined by the elevations of the arc start and end points.