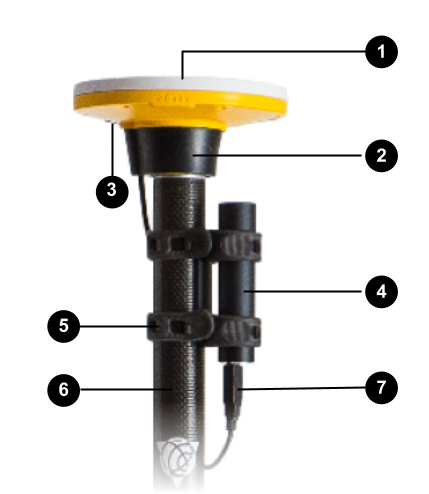
DA2 pole mount setup
To set up your Trimble Catalyst DA2 GNSS receiver for field use using the standard pole mount setup, use the steps below.
If you prefer to carry the DA2 in your hand rather than fitting it to a pole, see Catalyst Handle setup for DA2 handheld use.
 Standard set up
1 — DA2 GNSS antenna
2 — Push-fit mount & 5/8-11 thread adapter
3 — Power button (LED shows Power & Bluetooth status)
4 — USB power bank (sold separately)
5 — Mounting kit for single-cell cylindrical USB power banks
6 — Range pole (sold separately)
7 — USB power cable
Additional mounting accessories, including survey poles, adapters and backpacks, are available from Trimble or third party accessory vendors. For more information, see DA2 accessories.
For precision applications (10 cm or better), Trimble recommends fitting the DA2 to a 2m or higher survey pole.
Use the push-fit mount and the 5/8-11 thread adapter provided with the DA2 to fit the DA2 onto a standard Trimble mapping or surveying pole.
-
If using the receiver on a pole, ensure that it is flat and secure on the pole.
-
If using the push-fit 5/8” x 11 thread adapter, ensure that the yellow plastic of the thread adapter is completely concealed in the push-fit mount.

Watch the videos Trimble DA2: Mounting Systems for the DA2 and Trimble DA2: Mounting the DA2.
The DA2 receiver can be powered by any USB-compliant power source, including portable USB power banks, and/or mobile devices that support USB Host or USB Power Delivery functionality. See DA2 power options.
If you are using a USB power bank, you can use the battery mounting bracket provided with the DA2 to secure the power bank to the survey pole. The supplied battery mount is designed to fit a variety of range pole and USB battery pack sizes.
To fit the battery mounting bracket, watch the video Trimble DA2: Assembling & Using the DA2 Battery Pack or refer to the steps Fitting the USB power bank to the pole.
Connect your device to the DA2 using Bluetooth:
-
On an Android device, you can connect directly to the DA2 receiver from the Trimble Mobile Manager app or other supported Trimble field software. See Connecting the DA2 with an Android device.
-
On an iOS device, you must first connect the device to the DA2 from the iOS Bluetooth settings screen, and then connect to the DA2 the Trimble Mobile Manager app or other supported Trimble field software. See Connecting the DA2 with an iOS device.
To connect your device, watch the video Trimble DA2: Connecting & Pairing the DA2 to an Android Device or Trimble DA2: Connecting & Pairing the DA2 to an iOS Device.
-
Download and install Trimble Mobile Manager, and then launch start Trimble Mobile Manager and sign in using your Trimble Identity.
-
Select the DA2 in the Position Source screen and then enable the Position Source switch in the Home screen to connect to the DA2.
Trimble Mobile Manager connects to the receiver and shows the Trimble Catalyst subscription information for your account.
-
If an update to the DA2 firmware is available, a pop-up notification prompts you to install the update to the DA2. See Updating the DA2 firmware.
-
If required, configure real-time corrections and output transformation settings. The Home screen shows the quality of positions achieved.
-
When you are finished, always disconnect from the receiver in Trimble Mobile Manager, or close the application.
For more information, go to the Trimble Mobile Manager Help.
To use the DA2 with your chosen field software, refer to the documentation for the field software. For more information, see Supported apps.
For best results, make sure you are familiar with recommended best practice.