To stake out a station at a skew offset from an alignment
To customize the stations available for stakeout, tap  next to the Station field to view the Select station screen. See Stations available for stakeout.
- In the Stake field, select Skew offset.
-
Tap
next to the Station field and select the station or enter a nominal station value. -
Tap Skew offset and enter the skew and offset values.
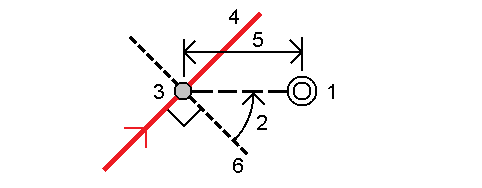
As shown in the diagram below, the point to stake (1) is defined from the station (3) by an offset (5) along the skew (2). The skew can be defined by a forward or backward delta angle to a line (6) at right angles to the alignment being staked (4), or the skew can be defined by an azimuth. The diagram shows a point defined by skew forward and offset to the right.
- The elevation for the point can be defined by:
- Slope from alignment – the elevation is computed by a slope from the elevation of the alignment at the entered station.
- Delta from alignment – the elevation is computed by a delta from the elevation of the alignment at the entered station.
- Key in – the elevation is keyed in.
If the alignment only has a horizontal alignment, the elevation for the point must be keyed in.
-
If construction offsets are required, tap and hold in the map and select Define construction offsets. Enter values in the Construction offsets field. See Construction offsets.
If the computed position is before the start or beyond the end of the alignment the point cannot be staked.
- Tap Start.
-
The elevation of your current position, the design elevation of the selected position, and the skew offset and delta information are shown.
When the stake method is Station on alignment or Skew offset, you can edit the elevation. To edit do this, press the Space key or tap
 and enter the new elevation value. The original design elevation is automatically restored as soon as you change the design or the section of the design being staked, or once you exit stakeout. To restore the original elevation during stakeout after you have edited it, press the Space key or tap
  and then tap next to the Design elevation field and select Reload original elevation.
When staking a station at a skew offset, the cross section view is unavailable.
-
When the point is within tolerance, tap Measure to measure the point.
When using a Trimble SX12 scanning total station in TRK mode with the laser pointer enabled, the Stakeout screen shows the Mark point softkey instead of the Measure softkey. Tap Mark point to put the instrument into STD mode. The laser pointer stops flashing and moves to position itself at the EDM location. When you tap Accept to store the point, the instrument automatically returns to TRK mode and the laser pointer resumes flashing. To remeasure and update the stakeout deltas, tap Measure after you tap Mark point and before you tap Accept.
- Tap Accept to store the point.
- If you selected the View before storage option, the staked deltas you selected in the Stakeout options screen are shown. Tap Store.
-
Continue measuring points along the alignment. To select the previous station, tap the Sta‑ softkey. To select the next station, tap the Sta+ softkey.
Alternatively, tap
next to the Station field to open the Select station screen and then from the Auto increment field select Sta- or Sta+ to automate the selection of the previous or next station.
